For Parents: Harley Email Visibility

If you are a Harley parent and use Gmail, you might benefit from creating a filter for incoming Harley email.

For some reason, Google enabled categories for their users when they released this feature. Depending on your email habits and the types of messages you send/receive, Google will automatically categorize your email for you. Unfortunately you have limited control over this and some people are not even aware there are other categories not shown in their main inbox view.

Sometimes bulk mail from Harley (to all parents or to certain classes) can land in other categories and be missed. To avoid this situation, the easiest option is to simply turn off categories.

Turning off categories

To do this, click on the gear and select Configure inbox:

categories1

Then simply uncheck all the categories and click on Save:

categories2


Keeping categories on and using a filter

If you would like to keep using categories, you can just add a filter that will automatically put all Harley email in the personal category and display it in the main inbox view:

Click on the gear and select Settings:

filter1

Then select the Filters tab and click on Create a new filter at the bottom:

filter2

Enter “harleyschool.org” in the From box and click Create filter with this search:

filter3

Then pick your options for this filter. The most important being the Categorize as option near the bottom. Set this to Personal. You also might want to check the Also apply filter to matching messages box so previously received messages will be re-categorized too. Then just click Create filter and you’re all set.

filter4

New Employee Info

Rather than keeping a document up to date and distributing it to all new faculty and staff, it’s easier to just post here and send out the address. Below is some useful information about the technology we use and how you can access it.

Wireless

There are a couple options for wireless at school. You should see a WPA2 protected SSID called Harley_Secure and an open SSID called Harley_Guest. You can connect to the secure network using your Harley username/password which will give your device the same access as a wired device. You’ll need to install this SSL certificate to avoid errors when viewing https sites. You could also connect to the guest network with no authentication, but you won’t be able to access any file servers or network resources other than the internet. The extra certificate is not needed on this network. The guest network will most likely be the easiest way to connect your personal phones/tablets to get internet access.

There is also a deprecated SSID called hswlan. This is a legacy network from our old wireless system that will most likely disappear in the very near future.

Email

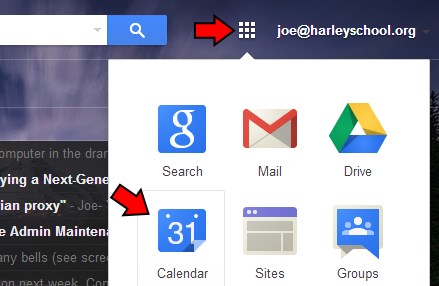
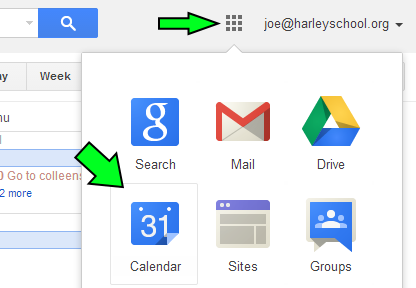
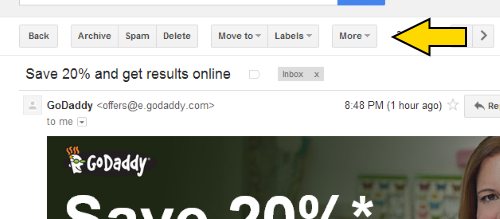
Our email is handled by Google Apps for Education. Once you receive your email address and password you can access your email by visiting the Gmail website from any computer:

https://gmail.com

Your Gmail password is synced with your Harley network password. Changing your Harley password will automatically change your Gmail password to match. This does not work in the other direction though, so if you change your password in Gmail, keep in mind your Harley password will not change.

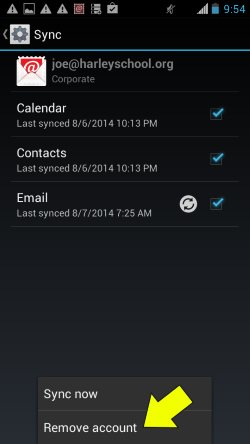
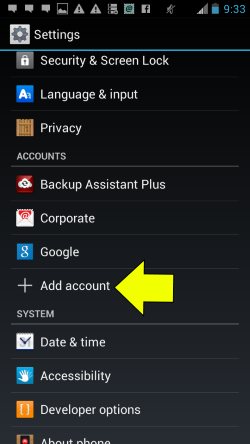
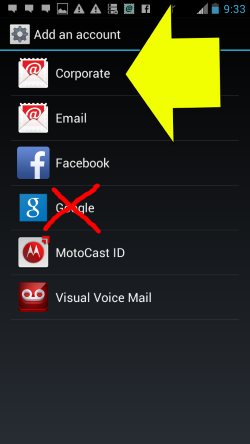
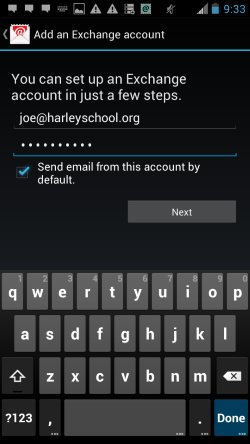
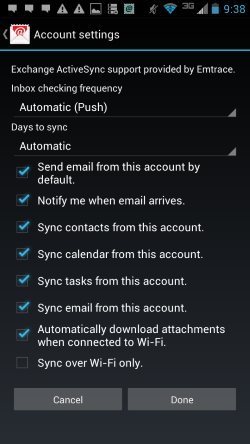
Feel free to add your email account to any and all mobile device you have. Using the Gmail App is the preferred way.

Student/Course Information

Access to our student information system (Senior Systems) is done through a webapp called My Backpack. This is where you can see your class lists, view student information, enter grades/comments and enter attendance. Your Harley username/password gives you access to this site.

https://my.harleyschool.org

Phones

You will have a phone in either your classroom or office. Calling another Harley phone is as simple as dialing its 4-digit extension. To make an external call you can either dial 8 before the number or press the “Outgoing” button on the phone to acquire an outside line.

442-1770 – our main number, rings at the front desk

442-1777 – goes directly to the auto-attendant, good for remotely checking voicemail.

442-5758 – our fax line

Your phone also has a direct dial number. Dialing 277-xxxx from an external line where xxxx is your extension will ring your phone directly. If you don’t like this feature or find it disruptive please let us know it can be disabled.

You can check/setup your voicemail externally by dialing into the auto-attendant (442-1777) and pressing the star (*) key. It’ll prompt you for your mailbox number and passcode. When a message is left in your voicemail box, you will be notified via email and an audio file containing the message will be attached.

Websites

If you currently have your own personal website, keep using it if you like. You can use Google Sites built into your Gmail account if you are familiar and like that. If you are familiar with WordPress you can create a site here with the URL structure of http://sites.harleyschool.org/<whateveryouwant>

Just visit this page and click the “Register and Create Site” link. You can only sign up for an account with a harleyschool.org email address.

http://sites.harleyschool.org

Document Storage

There are a few places you can store your documents with varying levels of security and accessibility.

  1. Google Drive
    Only you have access to your Google account and therefore only you have access to documents stored in your account. These are hosted in the cloud and are accessible from any computer and can be shared with anyone. With an institutional account, you have unlimited storage space with Google.
  2. H: Drive / Home Directory
    This is a directory mapped to your profile when you login to a computer at school. It’s linked to a local file server and is therefore only accessible on a school computer. Only you have access to these files and they are not able to be shared. Disk space is also limited on this system. This is a good spot for private confidential files.
  3. S: Drive / Snap
    Snap is primarily used as student file storage, but you are welcome to use it. There are no access controls on Snap, so any document can be read and edited/deleted by anyone. Although this is possible, it rarely if ever happens maliciously. This is not the place to store anything of a sensitive nature. Because of its wide open security, it’s perfect for sharing documents with students. Snap has considerably more disk space than your H: drive, but it does have a limit.

Help

If you need help or advice with anything technology related feel free to contact me.

Joe Reid
joe <at> harleyschool.org
277-1200

Booking Resources for Google Calendar Events

A resource is simply another calendar used to coordinate the sharing of a real object or space. For example the computer labs, the presentation cart, a chromebook cart or a bus. These are things that have to be shared between everyone and can only be used by one person (or class) at a time.

To book a resource follow these very simple steps:

  1. Create a new event in your calendar
  2. Fill in all the useful information, like time/date and title and description
  3. On the right side of the new event page there is a section about adding people/rooms
  4. Click on the Rooms, etc.  link and you’ll see a list of all the available resources – click add for the one you’d like
  5. Make sure you click Save at the top to write the event to your calendar and the resource calendar

If the resource you’d like isn’t listed, that means it is already booked for that time. You can add resource calendars to your calendar view so you can see when they’re already booked at a quick glance. To add resource calendars to your calendar view follow the steps in this blog post: Viewing Resource Calendars to Schedule Meetings


1-create

2-info

3-addroom

4-save


Viewing Resource Calendars to Schedule Meetings

If you plan on scheduling meetings in a particular shared space or want to bring your class to a space like the computer lab or library, you’re going to need to book those resources using your Google calendar.

You could always just schedule your event and add the resource praying that it’s available at the time you need, but you’re probably going to want to look at the resource calendar to see when it’s already booked. In order to do that you need to add the resource to your list of calendars.

  1. View your calendar by clicking on the Apps dots and selecting calendar
  2. Click on the down arrow next to Other Calendars on the left side and select Browse Interesting Calendars
  3. Click on the More tab and then on Resources for harleyschool.org
  4. Click on subscribe for the calendars you want to view and then click Back to calendar when you’re finished

1-selectcal

2-browse

3-more-resources

4-subscribe-back

Once completed, the subscribed resource calendars show up under your Other calendars section and will be overlaid on top of any other calendars you have. You will be able to easily see when the room is available to book for your classes and events.


Reports in My Backpack

I’ve had a lot of questions recently about running reports in My Backpack, specifically printing class rosters. By default My Backpack will try to display your reports in its Java-based report preview applet. This almost never works because of all the problems with java in recent years. Browsers just don’t trust Java anymore and in some cases can’t even be forced to run it.

So what’s the answer? Just change the output format. At the bottom of the page you submit to generate your report there is an option called “View Report In” which is defaulted to Report Preview. Change this option to Adobe Acrobat (.pdf) and your class roster or other report will open right up in Adobe Reader. You can then print or save from there like normal.

mbp-reports

Gmail as Default Mail Program

Sometimes it can be handy to simply click on hyper-linked email addresses and mailto: tags on websites and other applications and have it open your email with a new message already addressed.  If you use Web-based email like Google Apps or Yahoo this can be tricky to get working.

If you use Chrome as your browser with Google Apps you can simply click on the double diamond icon in the address bar and select Use The Harley School Mail and then Done.

doublediamond

doublediamond2


Check your Google Calendar Time Zone

A couple of people have mentioned time problems with their calendars. When working with other users calendars, events were showing up a few hours later than they should have. This came back to an incorrect time zone setting on the calendar. I did set the default time zone to GMT-5 (Eastern Standard) when I setup our company profile, but for some reason these users were set to GMT+00. Maybe this setting was taken from their Outlook profile when it was migrated, I’m not sure.  So please take a second to check the time zone on your calendar to avoid confusion and missed appointments.

Checking the zone

  1. Click on the Apps dots and select Calendar from the menu if you’re not already viewing your calendar
  2. Click the down arrow next to your calendar in the My Calendars section
  3. Click on Calendar Settings from the context menu
  4. Scroll down until you see Calendar Time Zone and make sure it says (GMT-5:00) Eastern Time
  5. If it does not, click on the Set my time zone link to the right.
  6. Select the correct zone from the drop-down list and click Save
  7. If the zone needed to be changed, check any events you added to make sure they’re now at the correct time.

dotsandcalendar

calsettings

settz1

calsettings2

A Successful Google Apps Migration

Well, it’s official, after a months of planning and implementing, Harley officially moved from Exchange Server 2003 to Google Apps for Education.

I chose to do the final switch on a Monday morning (August 11) so I could be there to help people and put out any fires the sprung up. I was totally amazed at the lack of an angry mob banging on my office door. I did my best to warn people and prepare them as best I could and I guess it worked pretty well.

I took care of just about everything myself. The users had only one thing to do: change their passwords. Google has password synching software to keep Active Directory passwords and Google Apps passwords the same. The problem is the software can’t get the current Active Directory password; it can only get the password during a password-change operation. So everyone needed to change their password in order to login to their Google account after the switch. I gave people a little over one month notice with a bunch of emails and even a snail-mail sheet in the back-to-school mailing. Obviously there are people who didn’t do it or waited too long, I was expecting that. I can’t wait to see how many people attack me on the first day of school saying they can’t access their email.

I migrated all user data a few times to break it up into manageable chunks. I did the initial migration in early July. Google imposes a 1 message per second per user throttle when migrating data. I would imagine this is to keep migrations from impacting current customers. A few users had a huge amount of messages and I was actually the biggest offender of all with over 150,000 messages in my mailbox. I have mail back to 2002. Do the math, that’s almost 2 days just to migrate my mailbox alone! And that’s as fast as it can possibly go, it’ll go slower with big attachments. I did the migration again a few weeks before the switch and then again just after the switch to ensure I had everything. The last one took only a few minutes since most of the data had already been migrated. I told people a head of time that we would switch and then I’d finish migrating data, this way they wouldn’t freak out if they noticed missing messages or calendar events. But it wasn’t really a problem since everything was switched over, working and migrated by 7:30am on Monday morning.

A few days before the switch I lowered the time-to-live (TTL) on the DNS records that were going to change to 2 minutes. This way I could make the switch and literally 2 minutes later it would be working. Most importantly this allowed me to change it back if something went wrong with only 2 minutes of propagation time. Most DNS system default to 1 full day. Once I was sure everything was working as it should I raised up the TTL again.

People are still getting used to this and how to do certain things, but for the most part I couldn’t be happier with how this worked out. What I’m most thrilled about is being able to retire my ancient Exchange Server without spending a dime.

Google Apps Tip #1: Button Icons or Text

Something that might help with the transition to using Gmail is changing the button labels from icons to text. Personally I think using text makes the interface look a little cleaner and less cluttered, but I’m sure some would disagree with me.

If you forget what an icon means you can always hover your mouse pointer over the button and you’ll see a tool-tip saying what it does.

buttonicons

buttontext

In order to make this change simply click on the gear, then Settings. Scroll down to Button labels and select the form you want. Don’t forget to scroll all the way down and click Save Changes.

Updating Android Devices for Google Apps

Because there are so many different version of Android compiled and customized by so many different manufacturers, it’s impossible for me to make a bulletproof guide with screenshots. These steps are just to nudge you in the right direction. Your device will most likely look different than the screenshots. The screens were taken on a Motorola Droid Razr.

In order to switch from your old Harley mail to your new Google Apps account on your Android device (phone, tablet, whatever), you’ll need to first remove the current account and then setup a new one. If you’ve never had your Harley mail on your device you can skip down to the add account instructions below.

Removing Harley Accounts

Remember, this is just to give you the general idea, item locations and names might be different on your device.

  1. First view all your apps by hitting the button with the 9 dots
  2. Tap on Settings
  3. Scroll down to the accounts section and tap Corporate or Exchange
  4. Tap on the Harley account (probably shows as your Harley email address)
  5. Hit the menu button and select Remove account from the popup menu
andriod-settings android-remacct
android-remacct2 android-remacct3

Adding your Google Apps Account

Remember, this is just to give you the general idea, item locations and names might be different on your device.

  1. Tap on Settings
  2. Scroll down to the Accounts section and tap Add account
  3. Select Corporate or Exchange, ***NOT Google or Gmail***. This doesn’t make much sense but trust me on this.
  4. Enter your email address and password and tap Next.
  5. You should be presented with more options. Type your email address as the username, enter your password and enter the server as m.google.com. Make sure Use SSL is selected.
  6. Next select all your sync options and you’re all set.

Data from your mailbox will slowly start showing up. It might take an hour or so for everything to appear.

andriod-settings android-addacct
android-addcorp andriod-address1
android-address2 android-finish

If you setup your Google Apps account as a corporate or Exchange account on the device, it should look and act identical to your old Harley account.